If you want to make money with your blog, the very first step is creating a media kit. This post breaks down what a media kit is, what should be included and how you can design one for your blog!
Can’t listen to the episode? Read on for the transcript!
I always seem to end up saying this every year, but I just can’t believe how fast this last year has gone by.
This last year has been a huge year for my business, especially with shifting into doing web site, doing web design full time, but somehow I have even bigger plans for next year. I cannot wait to share those plans with you guys when the time is right.
Speaking of web design, I wanted to mention that I am currently booking for early 2020. If you’re looking to redesign your food blog in 2020 I would love to chat with you.
I am so excited to be jumping into a new series on design, and I’m really excited to be giving you specific tips on design and graphics for your blog. Things like media kits and Pinterest templates and freebies.
Today we’re going to jump in and start talking about how to design a media kit.
What is a media kit?
First things first, what is a media kit?
A media kit is a one to three page document usually that connects your blog to a brand immediate kit, answers a handful of things to a brand that you’re looking to work with.
It answers who, what, why, and how about your blog.
Who you are and who your audience is, what your blog is about, why they should work with you and how they can work with you.
Why do you need a media kit?

When you start thinking about working with brands or if you know that you want to work with brands at some point, it’s really important to have a media kit.
This gives a brand a snapshot look at your brand and helps them decide whether or not your brand is in alignment with theirs.
When should you create a media kit?
Recently I designed a website for a brand new food blog. She was just getting started. This was actually her second food blog, but she knew with this new one that she was going to want to work with brands as soon as possible.
Even though she had literally zero stats and zero audience, we went ahead and created a media kit for her so that she can use that later on to start pursuing partnerships with brands.
If it’s a part of your plan for your food blog to work with brands, then I would go ahead and make a media kit as soon as possible.

This media kit can change and grow as your food blog grows, but having something to start will make it much easier to respond to brands if and when they start reaching out to you to work together.
Once you have your media kit, you can add it to your contact page and send it over when a brand inquires with you instead of linking to the actual media kit anywhere on your site.
This is a lot easier so you’re not constantly having to update the one that is on your blog. You can just update it whenever you get a request for it.
What needs to be in a media kit?
Now that you know what a media kit is and why you should have one, let’s talk about what needs to be in your media kit.
Your Logo
The first thing is going to be your logo. You’re going to want to have that at the top of the media kit or somewhere pretty prominent.
If a brand is working on a campaign, they’re likely going to have multiple media kits that they’re referencing. You want to make sure that they know who’s media kit they’re looking at right away.
A photo of you
This should be the main photo that you use across your social media platforms or that you have on your sidebar.
Using the same photo helps a brand recognize you or remember that they’ve seen your work somewhere else already.
About your blog
Then you want to have information about your blog. That starts with you.
You want to talk about the unique parts about you and your life. It may be things like the details of how many kids you have or how young your kids are, how old your kids are.
Maybe it’s specific lifestyle details about you that might be part of your story that you would weave into a campaign with a brand.
It’s really important to tailor a media kit to a specific brand when you’re pitching.
If you know that there’s something specific about your story that aligns well with their brand messaging, then it’s really important to include that in this little bio section of you and your blog.
If there are other parts of your unique messaging that fit into the sponsored content, things like how you learned to cook, the type of diet that your family follows, or the type of diet that your audience follows. It’s important to include that as well.
Your Audience
Then you want to talk about who your audience. This doesn’t necessarily have to be the demographics of your audience, but more of a general statement of who your audience is.
Maybe your audience is filled with young moms looking for easy dinner recipes, or maybe your audience is a more established audience and is looking for techniques and tips for home cooking.
What makes your blog unique
Remember that someone who is working on a sponsored campaign and putting together bloggers for that campaign, maybe reviewing multiple media kits.
You really want your brand and your blog to shine through through this media kit.
You want them to see what makes your brand unique and why they would want to work with you.
Your popular posts
This gives a brand a snapshot of your best content.
When you have images of different blog posts that you want to showcase, you really want them to be your top content, your best content. It doesn’t necessarily have to be your most popular in terms of page views, but really the content that you want to shine.
If you were creating a blog post for this brand you would try to align that blog post to the success of these other ones.
You want to make sure that this is the type of work that you want brands to know you for.
For example, let’s say that you never want to make another muffin recipe again. Don’t put a muffin recipe in your media kit. If you don’t do easy dinner recipes anymore, don’t put that on there. If you don’t do cocktail recipes, don’t put that on there.
You really want this section to highlight not only your best content that you have, but what the content could look like if a brand decided to work with you.

Reader testimonials
Another section to have in your media kit is reader testimonials. This section is optional, and it doesn’t have to be something that you seek out.
However if you have comments that you’ve gotten on your blog or even on your Instagram posts of someone saying how much they love your recipe and how it changed their life in some way, it would be really powerful to put those testimonials and comments on your media kit so that a brand can see the effect that you’re really having on your readers.
Stats and analytics
The next section is going to be stats and analytics. You can start with social media stats, but you only want to put the profiles that you’re most active on.
Food bloggers (and bloggers in general) have a tendency to sign up for the latest thing because who knows if it’s going to take off or not. We all remember things like Periscope or even Snapchat had it stay.
If you’re not active on a profile, don’t put it on there because a brand is going to go to that profile and see that you’re not active and you don’t have an active community. That’s not something that they’re going to want in their sponsored campaign.
Showcase the best social media networks that you have that have either the top numbers or the top engagement that you would also want to include in a sponsored campaign.
Let’s say you have a lot of followers on Twitter, but you’re not going to do Twitter as part of a sponsored campaign, then don’t include that. It’s not worth it.
If you’re working on updating an old media kit, let’s say that you’ve already had one in the past, go ahead and remove any social media accounts that aren’t around anymore or you don’t have an engaged following on.
For example, if you have your Google+ numbers, since that is no longer around, just remove that completely. You don’t need to showcase that at all.
For analytics you want to include an average of the last 12 months so that you can consider traffic spikes.

This can kind of depend blog to blog. Some people like to do just a 30 day number, but with food bloggers specifically, traffic can fluctuate so much from month to month and season to season that it’s really helpful to give a realistic picture of what traffic looks like.
The only time that this might be different is if you are specifically working on pitching stuff for quarter four or quarter one if that’s your high traffic season.
If it is a high traffic season and you really want to showcase the possibility for that brand, then I think it’s okay to put maybe last year’s stats from quarter four, for example.
Otherwise, if it’s any other time of the year or if it’s just kind of general pitching, then include an average, and you can list that it’s an average too so there’s no confusion from the brand of where these numbers are coming from.
You want to make sure that you’re using Google analytics stats.
If you don’t have Google analytics on your site already, you definitely want to change that as soon as possible. You want to use the Google analytics stats because those are what are the standard.
You can include your average page views for a month. You can include the users or the sessions, either one, but just list out which one you’re showing. You can also showcase how many email subscribers you have.
If your first thought is, “Oh well I only have X amount of email subscribers“, that’s okay. Email really is an up and coming thing for the blogging niche specifically, and brands know this.
If you are working on building your email list, if you’re working on getting them to be an engaged email list, then include that number. Even if it’s what feels like a low number to you, it may mean more to the brand than you can realize.
If your stats don’t feel very worthy of sharing…
That is totally a normal feeling to have. We all wonder what “good stats” look like, but just share your best stats.
You can’t change what your stats are, and if a brand comes back to you and asks for them, you’re going to share your analytics with them if you want to work with that brand.
Don’t feel embarrassed by it or feel any lack of confidence. Just share the ones that are the best and you feel the proudest of.
If a brand is looking for something specific that you didn’t include, they’ll going to ask for it.
Not all brands are looking for huge influencers. A lot of them are turning towards looking for engaged followings, not big numbers.
If you have an engaged following, even if it’s small, that’s really important to showcase. They’re really gonna want to make sure that if they partner with you, that your content is actually going to get seen by the people that they want it to be seen by.
Share what you have with confidence.
Relevant demographics
This is another place that you can share some information about your audience specifically, and you can use numbers and demographics here.
You can share about who your readers are, whether that’s:
- A percentage of how many are women or how many are men
- What age range they fall into
- Their preferences or hobbies
- Other information that would help a brand to get a picture of who your audience is
If you don’t have this exactly picked out, you can refer to episode two, where I talked about finding your ideal audience.
You can talk about who your ideal audience is so that brands can understand kind of a better picture of what your brand is and who you’re trying to attract
Sharing your audience with the brand is going to help them set expectations.
For example, if a brand is coming to you and they’re really hoping to reach male audience members and you don’t have any, then they’re going to know that right away and that’s okay.
Not every campaign is going to be a perfect fit for your blog, so you want to know whether or not the collaboration is in alignment.
That’s just going to set up the campaign for success because the brand will have the right expectations, and it’s just going to be a better partnership overall.
Brands you’ve worked with
Now the next section is sort of like a portfolio for your brand. This is a section where you can show a past collaborations with other brands, but be cautious with this.
Sometimes it’s really helpful to show that other brands have trusted you in the past, but sometimes brands have specific guidelines for competitors and how often you can work with someone.
For example, if you worked with a sugar company in the past, they may not be able to work with you if they are also a sugar company and have competition rules.
If you include a logo, even if it had been a year or six months, they might automatically assume that they can’t work with you instead of being able to track down details of when you worked with a brand in the past and then making their decision based on that.
You can also share testimonials from brands that you’ve worked with in the past. If you’ve gotten feedback from brands that you’ve worked with and they have good things to say, this is a perfect place to include that.

If you don’t have that information, that’s totally fine. Just something to think about for the future in future updates that you might make to your media kit.
Services you offer
The next section is going to be talking about what kind of services you offer. You want to include the different types of campaigns that you’re willing to work on.
Some people love doing video or others love doing in person events. If you don’t love a certain type of campaign or project and you wouldn’t do that for a sponsor, then obviously you’re not going to include that in this section.
You want to keep this pretty general though, and this is not a place that you want to put pricing.
I don’t ever recommend putting pricing on a media kit.
Wait until you’re able to connect with a brand and talk to them about what they’re looking for before you put pricing anywhere.
This is also a really good place to let a brand know what’s well received by your audience.
For example, if you know that your audience loves live video, then really showcase that in this section so that a brand will know if they really want to reach your audience.
Sometimes brands are going to come in and they’re already going to have a certain set of deliverables that they’re looking for, but you want to showcase kind of what is the best version of a campaign for your audience, what does that look like and what’s included.
Then the brand can always take away things or add things based on what they’re looking for and their budget of course.
Contact information
Then you’ll include probably the most important part of your media kit is your contact information.
It might seem obvious that they would be able to find you or contact you, but remember that depending on what the brand is, the person that you’re connecting with and emailing may have nothing to do with the campaign itself.
They may just be a person who is collecting information and handing it to somebody else.
So make sure that your contact information is readily available on your media kit. Include your website address, your email address, and you can sometimes include social media links.
I generally don’t recommend including your social media links if you have different usernames for different profiles, but if your username is the same across all of the platforms, then it’s okay to put an @ symbol and then your username right behind it.
If a brand wants to look at your profile, they should be able to do that from your website.
Designing your media kit
I know that not everybody is going to work with a designer to come up with their media kit, so I really want you to feel empowered to do this yourself if this is something that you want to take on.
The design should be consistent with your branding

If you haven’t listened to episode seven all about how to be consistent with your branding, definitely go back and check that episode out because it’s going to be really helpful.
Make sure, in general, that you’re using the same colors and same fonts as your regular brand when you’re designing your media kit.
Maybe the fonts and colors from your blog or from your logo itself.
Then you want to use the same types of images that you use on your website or your Instagram.
There are certain food bloggers that I know are known for certain shots or styles of images, and you want to make sure that it’s consistent across your blog, your Instagram, and your media kit.
You don’t want to use an image that you never use or something that would be kind of out of character for your blog.
Make it personal
This really is a resume of sorts, but it really shouldn’t feel corporate or stiff. It should feel like a snapshot of your blog, so don’t be afraid to make it feel like you.
This goes back to your brand messaging, your personality, how you infuse that into your blog. If you are sarcastic on your blog or Instagram stories, it’s okay to have part of that on your media kit.
Obviously you want your media kit to be professional and polished, but you don’t want it to feel like it’s somebody else’s.
You want the brand to get a good sense of what it’s going to be like working with you and the brand voice that your blog has so you can share insights into your personality and into your audience if they’re relevant to this partnership.
This is also going to set the campaign up for success because if a brand is coming to you and your brand is super laid back and casual and you’re known for having picnics on your living room floor and eating pizza out of a cardboard box, but they’re coming to you for a six course Thanksgiving dinner, that’s not going to be something that connects with your audience.
You really want to make sure that a brand is going to understand what they can expect and also what your your readers expect.
Make your media kit as long as it needs to be
I see a lot of people that ask questions about how long should your media kit be, and this is really one of those times where it depends is the best answer. Sometimes you need one page and sometimes you need multiple pages.
I wouldn’t go further than having three or four pages unless your blog is really large and has a ton of testimonials and past examples of you working with brands and things like that.
For the most part, most bloggers don’t need any more than three pages, but don’t feel like you’re stuck in having a certain page count if you feel like there’s relevant content that needs to be shared.
At the same time, you don’t have to pad the media kit with extra information that’s just going to cloud what a brand would want to see out of a media kit.
Start with one page and add more pages as you need to.
Use a program you know how to use to create it
The next tip is from episode eight, which is to design it in a program that you know how to use.
I talked about this in that episode, but don’t feel like you have to use a program that you’ve never used before to design a media kit because you think it should be done in this program.
It is 100% okay to use a program that you’re comfortable with, even if you’re seeing that the guru was recommend using Adobe illustrator.
For example, I absolutely love using Adobe illustrator, but I found for the clients that I’ve designed media kits for in the past that it just doesn’t make sense to design something in Illustrator that they can’t edit themselves.
Now I use Canva to create media kits for my clients and then they can edit those in the future.
If you are feeling totally overwhelmed with the idea of creating a media kit for yourself, you can purchase a template.
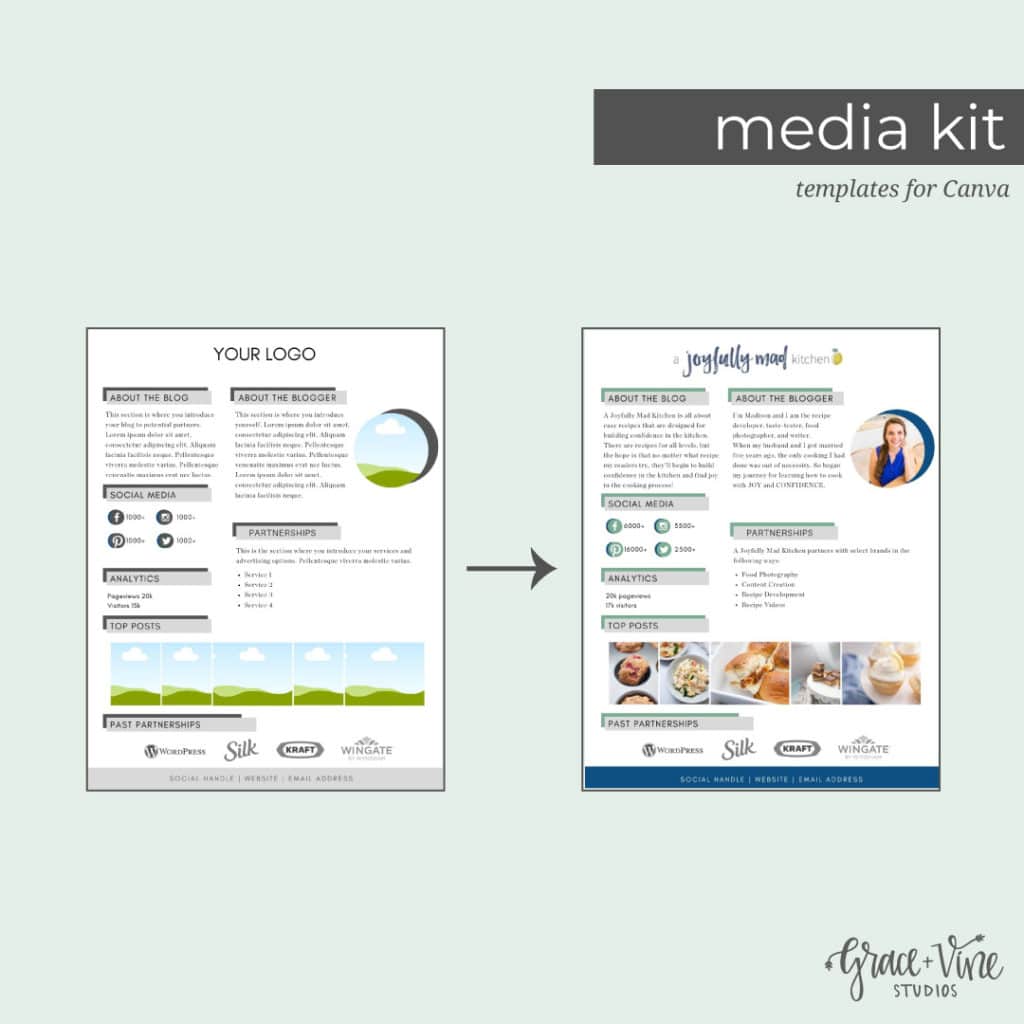
My template shop actually has a different styles of media kits for every type of food blogger. You can see the media kit templates that I have right here.
Once you purchase, you can go ahead and download it and get started on your media kit.
If you prefer to have something custom done, then reach out. I would love to work with you on a custom media kit for your blog to help your personality and your blog shine to brands that you’re wanting to work with.
Wrapping Up
As we start wrapping up, let’s go over again what a media kit is. It should be like a resume for your blog. It should share with a brand who you are, who your audience is and what they can expect from working with you on a sponsored collaboration.
You can and should have one, no matter what size your blog is, even if you’re just getting started.
It really shows the highlights of your blog, and you can decide to show your best stats or no stats at all.
A brand will ask for what they need to know before they work with you, so if you’re putting something on there that lowers your confidence and doesn’t make you feel as strong about your pitch to a brand, then don’t include that and you can always add that information later.
You really want to showcase why a brand would want to work with you and your blog.
If it’s your stats and that’s awesome. If it’s your audience or that you’re in a specific niche or you have a very targeted demographic of audience, then that’s great.
Share the information that’s going to help a brand to get an idea of what it’s going to be like to work with you and how they can benefit from working with your blog.
Your action steps from today’s episode is to decide whether you need to update an old media kit by a template.
You can create one or start working on designing one yourself, whichever way you decide to go.



Leave a Comment