Did anyone tell you that being a food blogger meant wearing all the hats, including the hat of a graphic designer? In today’s episode, we’re covering how you can simplify design work for your blog.
Whether it’s your Pinterest graphics, eBooks, or simply creating blog graphics that feel cohesive but don’t drain hours from your workday, you’re sure to learn something new in today’s episode.
Can’t listen to the episode? Read on for the transcript!
When I started getting more into blogging, I found that it was really the perfect blend of a lot of things that I love to do. It was writing involved photography and graphic design.
In fact, I started doing web design for food bloggers because I loved designing my own blog so much, and I started doing it for other friends along the way. Now it’s my full time business.
Maybe for you though, design work isn’t a part of your food blog that you love. Maybe you hate creating pins for your blog posts and put it off until the very last night before the blog post goes live.
If it feels like creating graphics for your blog isn’t the best use of your time as a food blogger, you’re definitely not alone. I hear this from food bloggers all the time, so today we’re going to talk about how you can make design work for your blog less stressful.
Before we dive into today’s topic, I have a quick request for you. If you’ve been listening to the podcast for a while, or even if this is your very first episode, I would love to hear from you.
I would love to hear what kind of topics you would like to hear about, what you’d like to learn about, or even what you’re struggling with right now in your blog, because usually that can help me figure out what you’d like to learn next, or even what you’re most excited about.
If you have any ideas, if anything’s popping into your head right now, will you head over to Instagram and DM me? I’m @graceandvine over there and I would love to hear from you and love to hear what you’re working on in your blog right now.
Okay, let’s dive into today’s topic.
Tip #1: Start With Consistent Branding
So my very first tip for simplifying your design work within your blog is to start with consistent branding. If you go back to episode number seven, you can learn all about how to be consistent with your branding.

The biggest thing is to start with a brand board.
A brand board is just kind of an overview of your brand and what you’ve chosen to include within your brand.
Things like your colors and your fonts.
Having your brand board as a reference can be a great place to start to make sure that you’re being consistent with choosing fonts and colors for things that you’re designing for your blog.
Depending on what type of designs you’re working on, these might not be the exact same font as your logo or the exact colors, but you can make sure that everything compliments each other well and works together well for the sake of simplicity and for taking away stress.
Stick with what you already have established for your branding when you’re just getting started with design work for your blog.
If you’re using different fonts all the time for different graphics or for Pinterest all the time, you’re making it hard for people to recognize your brand. You’re also driving yourself a little crazy.
People like to go wild with graphics on Pinterest, but simple really is better.
Think about how many people are using Pinterest on their phone, for example. Your graphics are going to get shrunk down to about 25% of the original design.
That means that when you’re using a lot of fonts or a lot of colors, it makes it really hard for people to read on the go.
People aren’t going to spend the time to take an extra second to look at what your pin says. They’re just going to scroll right on past. Make sure that you’re using fonts that are large and easy enough to read.
You also want to simplify the amount of text that goes on to a pin graphic.
You want to really use script fonts sparingly if at all for Pinterest. If you’re using them, use them as an accent to spell out a single word, but not the entire recipe title.
As you start to build out different graphics for your brand, even if it’s a Pinterest graphic or a social media graphic, you can start to use those as a sort of template to help you design other graphics and to maintain consistency between them.
Tip #2: Use a Program that Works for You
Now, there are a ton of different programs you can use to create graphics or other designs, but you don’t need to invest in something like Photoshop or illustrator to start creating blog graphics.
If you know how to use those programs, and if you have them already, then that’s great. You can use those.
But if you don’t have those programs or don’t know how to use them, don’t feel like you have to spend time learning something new. There are tons of free programs out there that are super easy to learn.
Canva is a perfect solution for 99% of the graphics that you’ll need for your blog.
To be honest, I was really against Canva when it first came out because I didn’t want to have to use something new. I really liked the programs that I had.
What I’ve found over the years of working with different clients is that Canva is such a good solution because it allows me to design something for my clients and then hand it off to them to be able to make updates in the future.
One of these examples is for media kits.
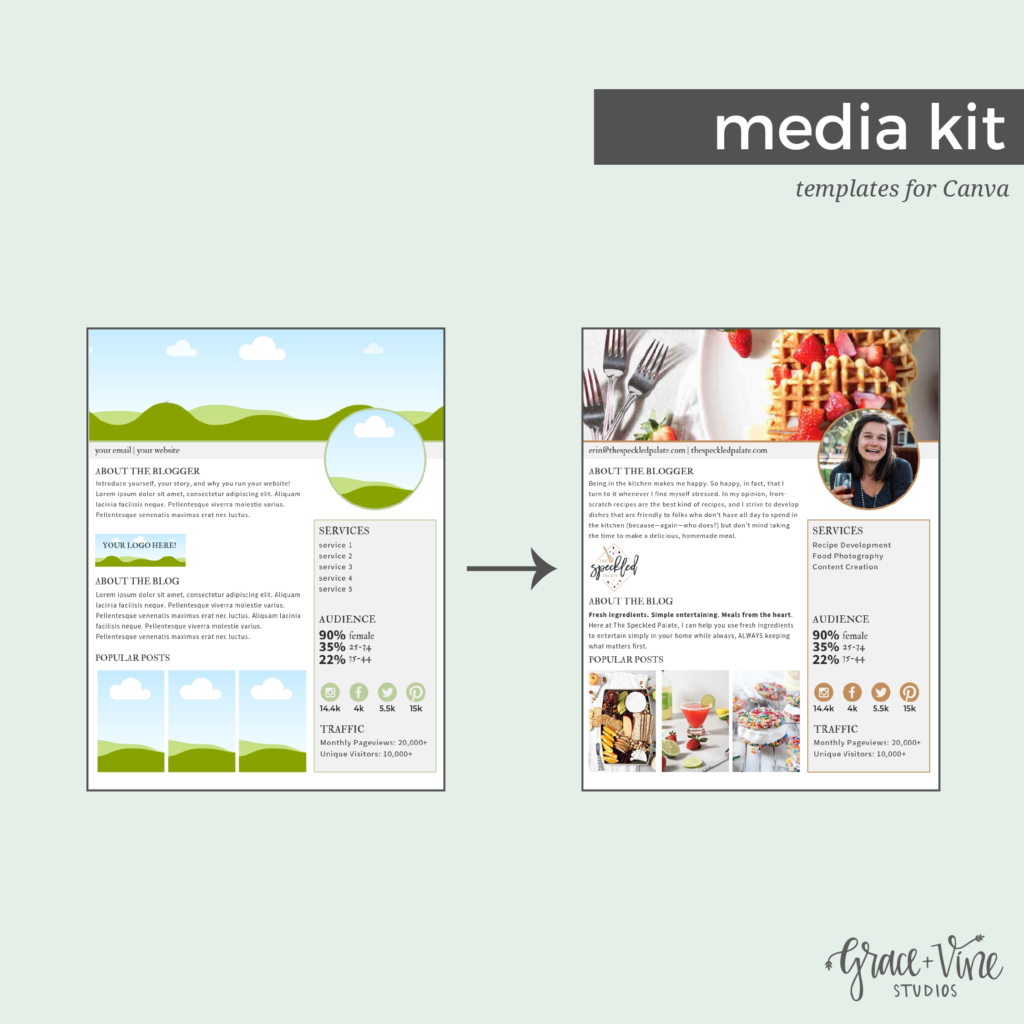
I used to design media kits a lot. I would design them in something like Photoshop or illustrator, and then my clients weren’t able to update them later down the road.
One of the things that is most important to me is that my clients are never stuck in having to come back to a designer, whether that’s me or someone else, to make small changes to either their website or to these kinds of graphics.
I have shifted into mostly creating these types of graphics for my clients in Canva because I can create a template for them, hand it off to the client, and they’re able to make any updates and changes to it that they need to make.
I just love being able to empower my clients to be able to take on their design work when they’re able and wanting to do that.
Canva is a perfect solution for design and graphics for your food blog, whether it’s Pinterest graphics, social media, graphics and ebook business cards.
Really Canva has so different options, and it’s a great place to get started. Plus I found that it’s much easier to learn than something like Photoshop or Illustrator when you truthfully don’t need to know how to use those for these kinds of graphics.
The only thing that I wouldn’t recommend designing in Canva is a logo.
This is simply because Canva is not set up to create logos that are going to be scalable – like making it really small for a business card or making it really big for a poster.
I recently was working with one of my clients and she needed to have her logo blown up to be a banner that got printed to wrap on the side of an RV for a parade (which is just super cool by the way).
But with a logo that had been designed in Canva that just wouldn’t have been possible. The graphics would have been totally pixelated and distorted.
That project was something she had to have a logo that was designed in Illustrator, and luckily she already had that.
Something that I want you to remember is done is better than perfect when it comes to the graphics for your blog.
If there is something that is stopping you from getting it done, you need to figure out how to let that go.
I have seen clients spend hours upon hours upon hours trying to make the perfect Pinterest template. Then Pinterest comes out and tells us that you should be making 5-10 graphics for each blog post.
If you spent five hours creating one graphic for your blog, that’s just not sustainable, so done is better than perfect here.
Just go with something and then see how it performs. You can always go back and change it and create new graphics or test something out, test out a different font or different color.
For now just get started and just try something. Use whatever program is going to let you get things done both efficiently and also just to get it off your plate.
Tip #3: Create and Use Templates
If you are constantly reinventing the wheel, there is no doubt that you are wasting time in that process.
Even for me, being a designer and having done this for many, many years, if I were to not have a working template file for something like a Pinterest graphic for my blog, it would take me at least twice the amount of time to create it new from scratch every time.
I might also have different ideas every time I’m creating something new, and while that might seem like a good thing, that is actually going to just distract me from getting the work done that I need to get done.
It’s a better idea is to use a template and save a working file of whatever you’re creating. Then the next time you need to create Pinterest graphics, you open up that file and you just use the template that you have.
Then the next time you need to create Pinterest graphics, you open up that file and you just use the template that you have.
If you start to feel like maybe your Pinterest graphics are a little bit stale or you want to redo them. That’s a time that you can get creative and try to come up with something new.

For the most part you’re going to want to stick to the same design for repetition, for ease of use for you, but also so people can start to recognize your pins on Pinterest.
If you’re using a program like Photoshop or Illustrator, this is going to mean that you’re saving a native file for that program. For Photoshop, that’s a PSD file, For illustrator, that’s an AI file.
In Canva this is actually not something you have to do. That’s additional work. Canva’s files are kind of a working file in and of themselves. What you want to just make sure of is that you just have that ready and you’re not going back in like deleting that file.
For something like Pinterest templates, this is completely essential. There’s just no need to recreate the same thing every time.
Most of your pins are going to look the exact same. Maybe you want to switch off the background color. But other than that, that’s about the extent of the customization you want to be doing to your Pinterest graphics from blog posts to blog posts.
This is going to save you at least 30 to 60 minutes of time every time you create Pinterest graphics, which means that you could be creating a Pinterest graphic in five minutes flat instead of spending hours upon hours working on them.
This also works for things like your media kit, eBooks or even freebies that you’ve created. You just really never know when you might want to reference something again.
Create a folder on your computer for brand templates (or create a folder in Canva if you’re using that), and save your working files there so that you can access them easily and reuse them again.
You’d probably be surprised at how many times you might even be able to just copy and paste a part of something like an ebook or a freebie and reuse it on a different project without having to start from scratch.
Tip #4: Purchase Templates
If you’re completely overwhelmed with even getting started with graphics for your blog, consider purchasing some templates.

This is really helpful if you absolutely hate doing design work and you just don’t feel like it’s a strength of yours.
There are so many templates out there. Everything from media kits to Instagram story templates to business card templates or Pinterest graphics. You can find templates for almost every type of design work that you would need to do for your food blog.
Having these templates is going to make the design work so simple in your blog because you’re going to have a high quality beautiful graphic that you can use without having to spend hours upon hours trying to perfect the design.
There are a lot of places online that you can find templates like this.
You can go to a place like Creative Market for these types of templates. I have found that a lot of their templates aren’t specifically designed for food bloggers, so you kind of have to use your imagination on how they might work.
I also have a template shop that you can head to to grab templates for things like your media kit, Instagram story templates for promoting your blog posts.
I’ll also be adding ebook and business card templates, all of the kinds of things that you would need for your food blog.
Check out my design templates for food bloggers here and use the code ‘podcast’ at checkout for 10% off your first purchase.
If you are having a hard time with visualizing what a brand board might look like, I have a Canva brand board template that you can grab and fill out with your branding to give you kind of an overview look of your brand.
Tip #5: Outsource Your Design Work
If you haven’t invested money into your food blog yet, you might be worried about the investment of hiring someone to help with your design work, which I totally understand.
How much time has it taken you to create graphics for your blog?
How many recipes could you create with that time? If you got it back, could you spend that time with just your family instead? Could you spend that time growing your blog in another way?
For each person, this is going to look different, but if design work is a huge pain for you and it’s something that you don’t feel strongly about, you should consider outsourcing it or add this to your list of things to outsource first when you’re able to.

I have a monthly design support package for helping clients with their design work in their food blog.
My clients have reported back that when they were doing their own design work, they would have an idea in their head of what they wanted something to look like and then they would spend hours trying to create it. But it would never come together quite like they had imagined.
When they hand those tasks off to me, it takes me far less time that would’ve taken them and they get to have graphics that they love and they’re proud of and the best part is they get to spend those hours doing something else to grow their blog.
Learn More
I usually like to tell my clients that anytime that they think about opening something like Photoshop or Canva, they can send me those tasks, and I’m able to take care of them in a fraction of the time. Then you get to focus on creating content and connecting with your audience.
If you’re in a place where you can invest money into your blog, outsourcing tasks that you don’t like, you aren’t good at, or simply don’t want to do is a great way to buy back time and to be able to spend time on your blog.
Wrap Up
I want to leave you with one action step for today’s episode: think about what is one area in design work for your food blog that is stressing you out the most and how can you simplify that one area?
Maybe that means coming up with a template, or it means purchasing a template or maybe it means hiring that out to somebody else, this might also be something that you’ve been avoiding working on.
Maybe you have an idea for a freebie or for an ebook, but you’ve been avoiding working on it because design is not your strong suit or maybe it’s just that Pinterest graphics take you way too long.
If they’re taking you hours of time for every blog post that’s just taking way too much time. You could be using your time in so many other ways.
Focus on that one area and making a plan for simplifying it.
I hope today’s episode has been encouraging for you that design work does not have to be something stressful for your food blog, and you can simplify it and make it an easier part of your blog.

Yes, this article will help me to increase efforts for blogging. Nice Post.